
I am really really blown away by this plant-dying business.
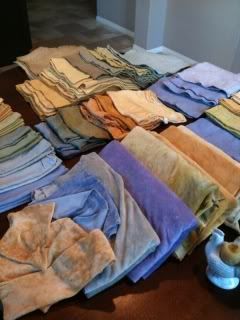
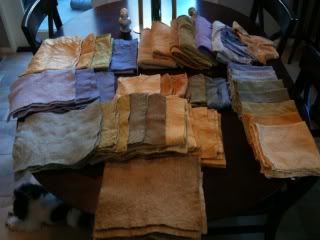
Check out the colors we got from BLACK BEANS, and RED and YELLOW ONION SKINS, and WALNUT HULLS.
It’s absolutely fantastic. And we did it in the kitchen!
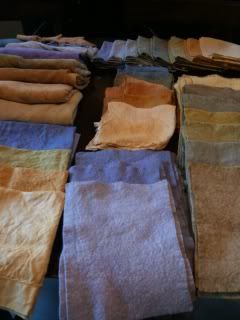
 Do you see those two blues sandwiching the silver velour? Those three pieces of velour all came out of the same vat of black bean juice. That silver looks like mink in the sun – you just have to see it, to believe that you can get this kind of range from black bean juice.
 I first posted about plant-dying here when Devana showed Sierra and I the plant-dying ropes while our combined five children romped in the mud. That post is worth a re-visit if only to compare the colors we got yesterday. With Devana we used mostly purchased plant dyes, which makes for a good rainbow spectrum.
In any case, Devana gave Sierra and I a BAD case of plant-dying. Also, since we’ve all been crafting up a storm through the winter holidays, we’ve discovered that we’re going through our felt stash far too quickly – and we’ve been clamoring for more plant-dying.
However, Sierra and I felt badly about how much work had been left on Devana’s plate (and backyard) at the end of the day the last time, so we resolved to be more prepared for our upcoming plant-dying session this Saturday. Hence, we borrowed a pot (a big one), ordered mordant, and started mordanting – so far, NINE POUNDS WORTH. Then we decided we could really do the red and yellow skins and black bean juice in advance too.
I never imagined we would be so wildly successful and productive with our tentative attempts.
Sierra and I went by our single day’s worth experience with Devana, lots of googling, some reference to a dyer’s handbook from the public library, and lots of flying by the seat of our pants.
In case you want to try a stab at it yourself, here are some very general directions.
1. Gather your materials. Our original intention was to dye lots of felt, but as per usual, we got side-tracked… The felt is JoAnn’s white felt by the yard (30%wool, 70% rayon – about $10/yard – buy it using a coupon), cut into 12″x 12″ squares. We ordered more cotton hankies from Dharma Trading (and Sierra ordered more silks and linen handkerchiefs too). The organic bamboo velour held color so surprisingly well last time, that we went in together and bought 10 yards from Celtic Cloths (webstore, which happens to be local in costa mesa).
2. Buy your mordant. I learned that mordant is the substance that binds to the fibre to the color: the proverbial glue. While some colors are self-mordanting (walnut hulls and indigo), we mordant everything regardless. This is a long process. Every pound of wool was simmered for two hours, stirred regularly, in a mordant mixture of one ounce alum and three ounces of cream of tartar. You can get alum and cream of tartar at a specialty dye webstore (earth guild) or through amazon.
I do one pound in a borrowed 18 L pot each evening. It cools overnight. Everything is wrung out and hung out to dry in the morning. Then you start your next pound…Once something is mordanted, it can be used wet or dry, sooner or later. Even, I guess, up to several years later.
3. Extract dye colors. While onion skins produce fantastic color, you need A LOT of onion skins. I buy onions by the bag at Costco, and keep the dry papery skins in a ziplock in the freezer. Once I finish a bag of red, I buy a bag of yellow. Also, I gather skins at the farmer’s market and grocery store. Sometimes if you develop a friendly relationship with the produce guy, you can score big.
FILL a pot with red or yellow skins (not both). Add water and boil. You can strain the skins, but we didn’t. We found it rather simple to just add fabric and swirl it around and let it soak or simmer until we liked the color. The skins were easy enough to brush off.
For black bean juice, Sierra simply soaked the beans overnight, and then poured the blackish water off. THAT’S ALL!! We were first inspired to try black beans by this discussion thread and pictures.
Cracked walnut hulls are also supposed to soak overnight.
4. Dye your stuff. This can get very particular if you are scientific, but because we don’t mind surprises, we just go for it. Supposedly you get different colors from whether the water is heated or not, and obviously from factors like the intensity of the dye, and even from the time of year the onions were harvested. You can color modifiers after the fact – like an acidic wash brightens (that’s just vinegar and water) and an iron modifier saddens (can be made with rusty nails and water – but caution, I’ve read that it can weaken or damage animal fibres, like wool).
We dip and swirl and keep an eye on things. If we think we like it, we pull it out and rinse. If we end up not liking it (rare) we toss it back into the pot or sometimes a different pot. We found we could make some lovely moss greens by combining the yellow from the yellow onion skins with the blue from the black beans.
We did not try things like blueberries or beets, which according to the book we had, are more of “stains” than “dyes,” and not worth the trouble.
So, what are you waiting for?
Start saving your onion skins!